oclHashcat-plus is a CPU / GPU password cracker with a huge number of options able to
handle a myriad of hash types.
I will go through steps I took to test the cracking of a WPA2 .cap file from my test setup.
I will be using BackTrack5 R1 to capture the .cap file with 4-way handshake and to create the required
.hccap file but will carry out the actual cracking of the .hccap file on a Win7 PC.
This as I am still worried that my knack of fubarring things up could prove life-threatening if I screw up a BTR1 HDD install on my main machine ;) so I'll stick with using a VM image for the time being..
lols..
PREPARATION
===============
First things first, I want to use aircrack to create the .hccap file from a standard .cap file using the new
-J option in aircrack as oclHashcat does not work with the standard .cap files.
The aircrack version included on the stock install of BT5R1 does not yet have this option -J included, so we need to get the latest and greatest from the aircrack site and do the necessary to install.
Grab the latest build of aircrack here (last one in the list at time of writing 06-02-2012 was r2061);
http://nightly.aircrack-ng.org/aircrack-ng/trunk/
extract and cd to directory;
tar -xzf aircrack-ng-trunk-2012-02-05-r2061.tar.gz
cd aircrack-ng-trunk-2012-02-05-r2061
To be able to correctly install the latest aircrack some additional installs required before trying to install aircrack;
(reference; http://hashcat.net/forum/thread-816.html)
apt-get install libssl-dev
(I had previously installed this hence the mention already the newest version)
Then from within the aircrack directory install with ;
make
make install

To update aircrack manually with previously downloaded files, there is a good detailed blogpost
brought to my attention by a reader here http://www.kknd.com.br/security/01/ on how to do that.
Using either of the above methods, you should be ready to rock and roll with the latest aircrack-ng.
v1.1 r2076, so;
will also get you a current version of aircrack which includes the -J switch.
CAPTURING THE WPA HANDSHAKE
===============
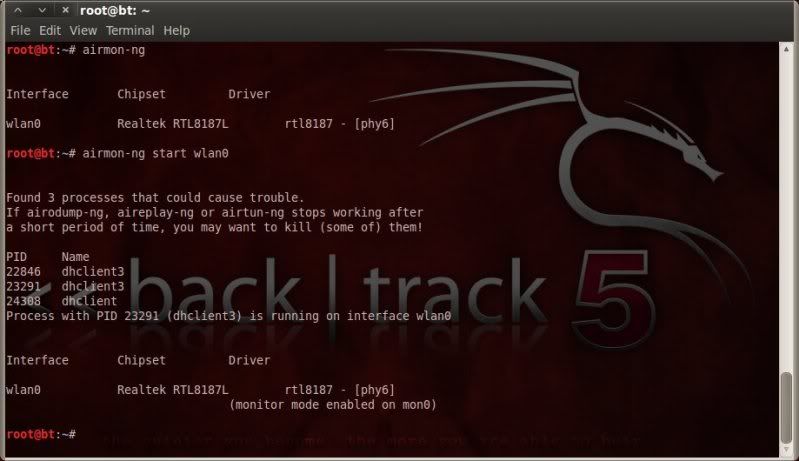
To start the process of capturing the handshake first place the wireless interface in monitor mode using airmon-ng;
airmon-ng
airmon-ng start wlan0
and then fire up airodump with options to focus only on your target AP, in my case ;
airodump-ng mon0 -c 11 -t wpa -d 98:FC:11:8E:0E:9C -w capture
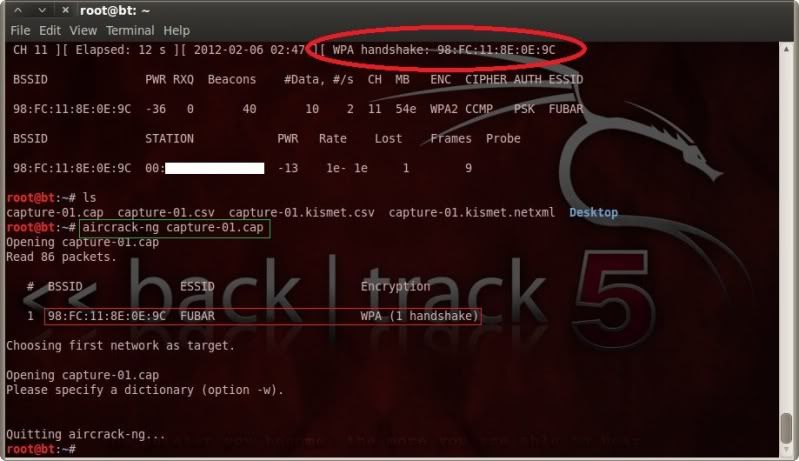
When the handshake is captured, either by patiently waiting for a client to connect, or by forcing a
connected client to disconnect/reconnect with for instance aireplay-ng, this will be noted at the top right hand side of the airodump window.
We can then stop airodump and verify that the handshake is captured with aircrack ;
aircrack-ng capture-01.cap
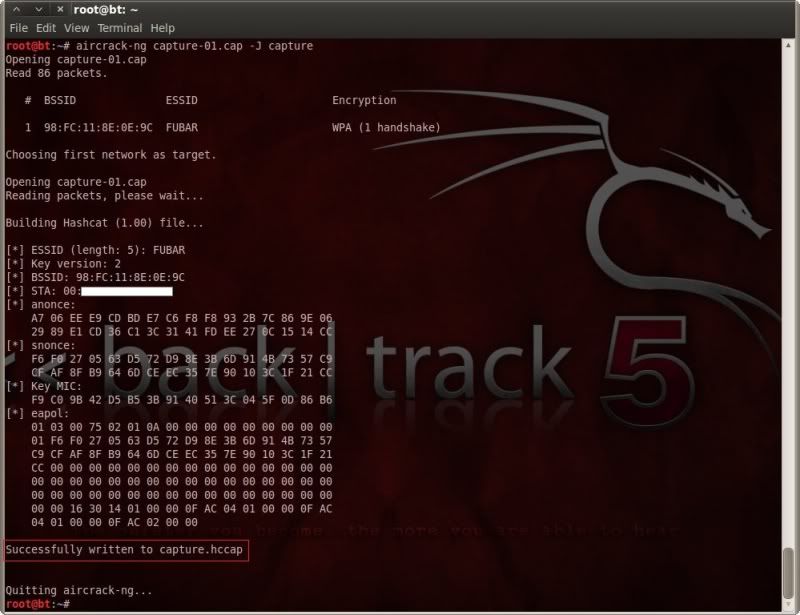
Now we have our .cap file with 4-way handshake, we need to convert it to .hccap format so that we
can use oclHashcat on it.
To do this we use the -J option in aircrack ;
(again, this option only available in the later aircrack builds, not in the stock install on BT5R1)
aircrack-ng capture-01.cap -J capture
Now we have our .hccap file, I will be switching to my Win7 PC for the actual oclHashcat cracking.
(yeah yeah..I know.. a bit of a fail... ;) )
OCLHASHCAT-PLUS
===============
First of course to download the latest oclHashcat-plus (at time of writing 06-02-2012 v0.07) if you haven't already done so and extract it to where you want, I extracted all files to ;
c:\oclHashcat\
Open up the command prompt ;
Start --> Run --> cmd
And move to the directory where you extracted the oclHashcat files to, in my case ;
cd c:\oclHashcat
I am running a 64bit Windows 7 system with an nVidia card (CUDA) so I need to run the cudaHashcat-plus64.exe file, with --help for further info ;
cudaHashcat-plus64.exe --help
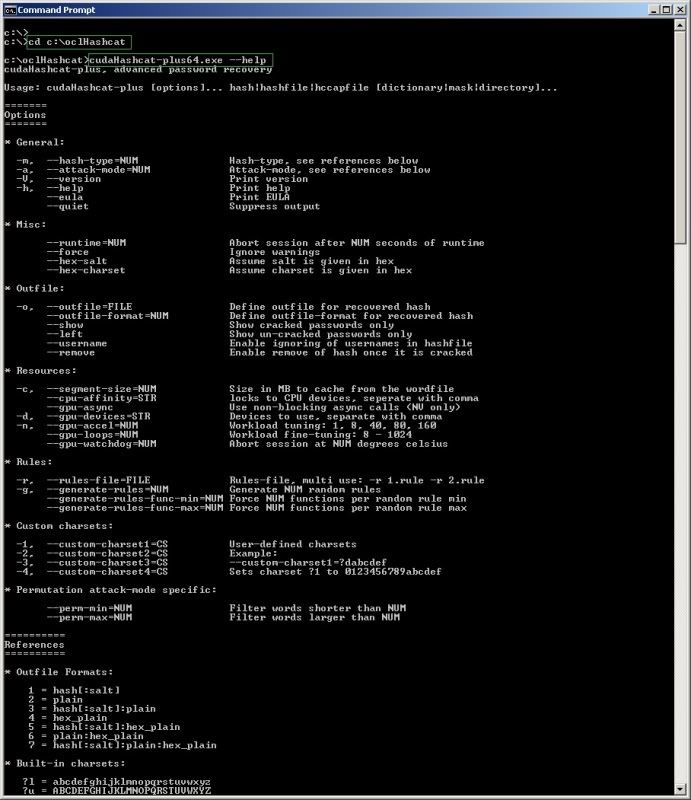
All the info may seem somewhat overwhelming, it certainly did to me, so herewith just a couple of
examples on how it can be used.
I copied the capture.hccap previously created to the oclHashcat directory on the Windows system as
'capture_fubar.hccap'
DICTIONARY ATTACK
===============
I will be using the rockyou dictionary as an example as it is a fairly large one, and copied the rockyou.txt file to the oclHashcat directory for easy access.
To start the crack, we need to specify ;
> The version of oclHashcat we need to use
in my case the 64bit version for cuda enabled cards, for ATI cards, you would use the ocl version.
> -m [hash type #] (see number references for hash types at bottom of help section)
in this case '2500' which is used for WPA/WPA2.
> The path to the hash file / hccap file
in this case 'capture_fubar.hccap' in the same directory.
> The path to the dictionary we are using for the attack
in this case 'rockyou.txt' in the same directory.
cudaHashcat-plus64.exe -m 2500 capture_fubar.hccap rockyou.txt
Press 's' to get an updated status report (I hit enter first to create as space between status reports)
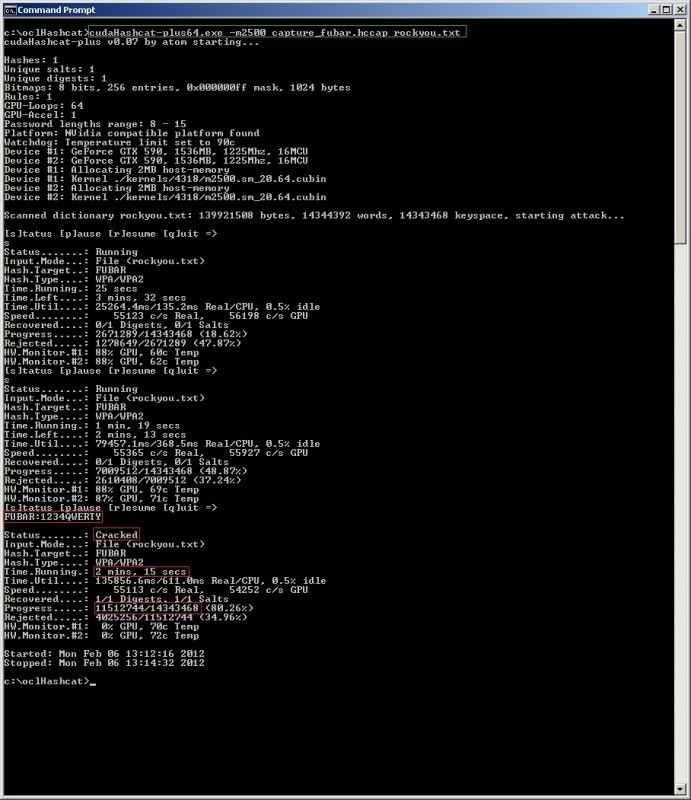
oclHashcat went through over 11,5million passphrases in 2min15sec at around 54k passphrases a second..
Increasing the load on the GPU with the -n option can increase performance and the number of passphrases checked per second ;
cudaHashcat-plus64.exe -m 2500 -n 80 capture_fubar.hccap rockyou.txt
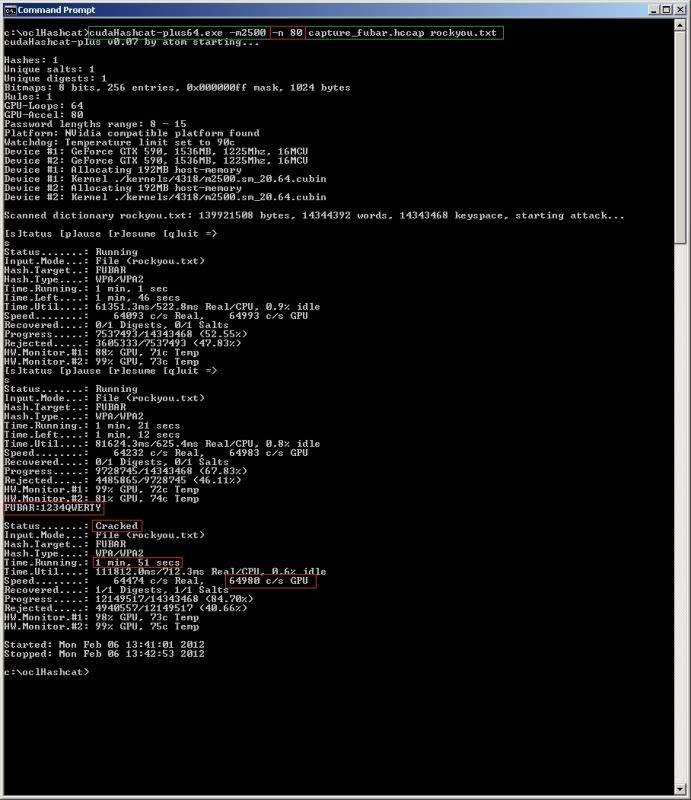
So with the increased load on the GPU it went from around 54k passphrases/sec to around 64k passphrases/sec.
MASK (BRUTEFORCE) ATTACK
===============
From what I read oclHashcat-plus is not yet able to mask bruteforce in increments (so first testing 8 characters then 9, then 10 etc) so you need to test that manually.
However not completely sure on the bruteforce options to be honest as I see in the WIKI there are specific
bruteforce options mentioned, but I can't seem to get that working as of yet.
Reading up ;)
The masked bruteforce attack works by defining character sets to use (if custom character sets are required),
and then uses the masks to define in which position in the passphrase the charsets should be used.
There are various predefined charsets, among which ;
?l -- lower case alpha
?u -- upper case alpha
?d -- numeric values
?s -- special characters including space
To start a mask / bruteforce attack, you need to specify ;
> The version of oclHashcat you need to use
> -m [hash type #] (-m 2500 for WPA/WPA2)
> -a [attack mode #] (-a 3 for bruteforce).
> The custom character sets (if any).
> The path to the hash file / hccap file.
> The mask to use.
The mask used has to match the length of the password, so if testing for a 8 digit password
you have to enter 8 mask entries.
If for instance testing all uppercase values for an 8 character password ;
cudaHashcat-plus64.exe -m 2500 -a 3 capture.hccap ?u?u?u?u?u?u?u?u

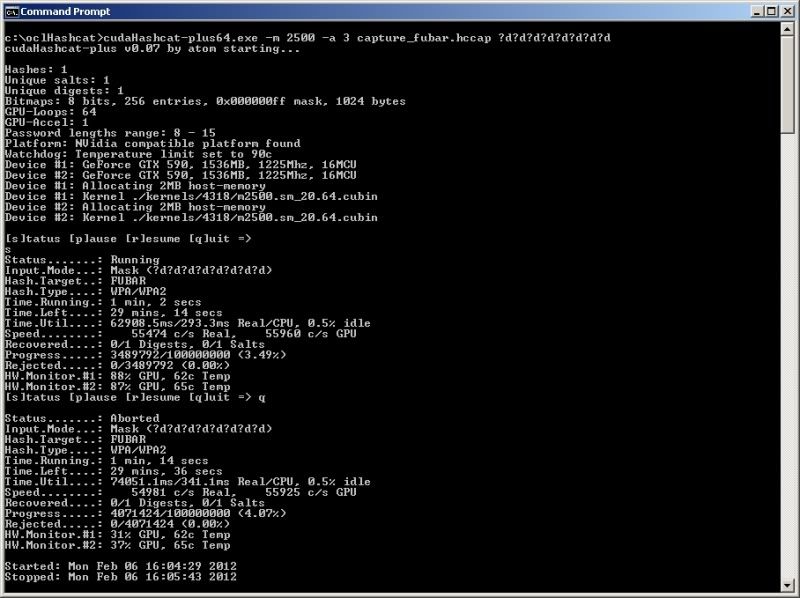
If testing for numeric values only for an 8 character password ;
cudaHashcat-plus64.exe -m 2500 -a 3 capture.hccap ?d?d?d?d?d?d?d?d
If we know that for an 8 digit password the 1st 4 digits of the password are numeric values and the last 4 digits are upper case values, then you would specify that as follows ;
cudaHashcat-plus64.exe -m 2500 -a 3 capture.hccap ?d?d?d?d?u?u?u?u

CUSTOM CHARSETS
You can define upto 4 custom charsets to be used, this is done by using the switches ;
-1, -2, -3, -4
So thinking of our above dictionary crack, for the sake of argument, lets say we know the passphrase
used is a 4 digit number only containing the numbers 1 2 3 4 followed by 6 upper case values only containing the letters Y T R E W Q.
We could create a custom charset containing the numbers 1234 and specify these to be used for the
first 4 digits of the passphrase.
and also create a second custom charset containing YTREWQ and specify these to be used for the last 6 digits of the passphrase.
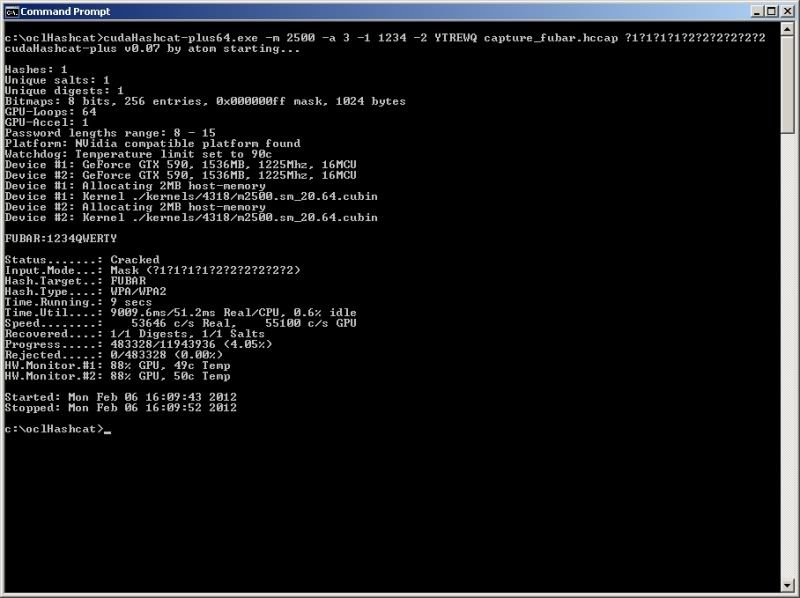
In the mask you would then specify where to use the 1st custom charset and where to use the 2nd custom charset with ?1 for the 1st custom charset and ?2 for the 2nd custom charset as follows ;
Of course this is not a terribly realistic scenario .. but hey, you get the idea..
cudaHashcat-plus64.exe -m 2500 -a 3 -1 1234 -2 YTREWQ capture_fubar.hccap ?1?1?1?1?2?2?2?2?2?2
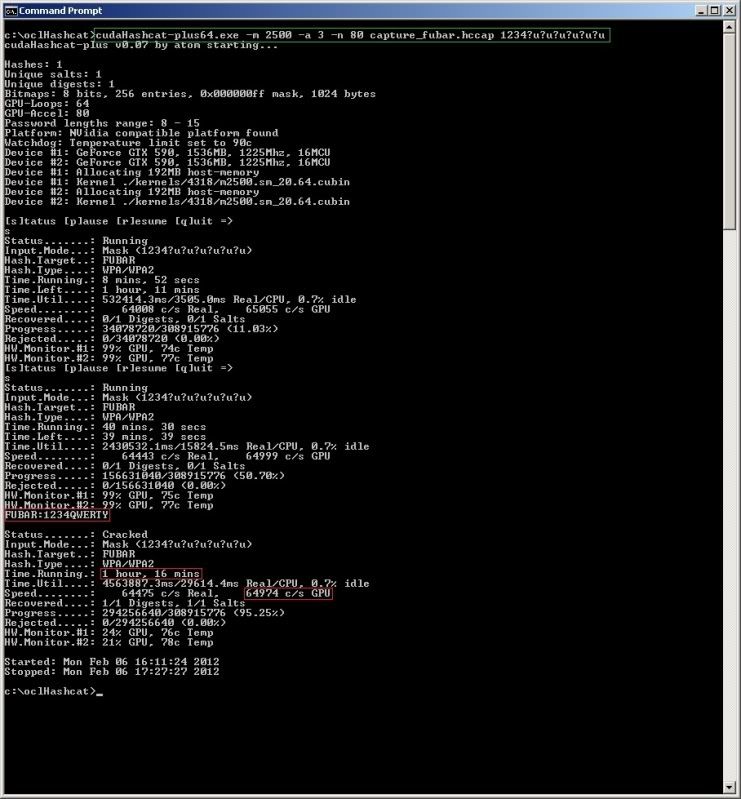
If you were to actually know that the first 4 digits of the passphrase are '1234' followed by 6 uppercase alpha values then you can define the 1st 4 values of '1234' directly in the mask ;
cudaHashcat-plus64.exe -m 2500 -a 3 -n 80 capture_fubar.hccap 1234?u?u?u?u?u?u
Of course the above examples are for the purpose of explanation only and probably not realistic for real-world scenarios, but I hope it shows at least a small part of how oclHashcat-plus can work.
oclHashcat-plus is truly an awesome bit of kit, the speeds are certainly astonishing to me since I was used
to non-GPU speeds before ;) 30 minutes to get through an 8 digit numeric wordlist ?!! awesome..
And thats just on my nVidia GTX590 which sux big time compared with the benchmarks I see on hashcat's site for the ATI cards..
There are many, many other options I need to get my head around; rules, dictionary mangling, bruteforce, the list goes on and on .. !
A lot more reading and testing required...
A good hint is to to also checkout the GUI for oclHashcat, it gives you a quick visual view of the commands
that you are using so that you can trouble shoot what you are doing wrong when trying just on the command line.
If I messed up anywhere on the above, please comment on it, have just started out trying hashcat so learning as I go !
Linkage/Credits;
http://hashcat.net/oclhashcat-plus/
http://danielweis.wordpress.com/2011/10/13/gpu-password-cracking-of-wpa-using-airodump-oclhachcat-gui-a-basic-how-to/
d3ad0ne's awesomeness ;
http://ob-security.info/?p=31
http://pauldotcom.com/2010/10/your-password-cracking-system.html
handle a myriad of hash types.
I will go through steps I took to test the cracking of a WPA2 .cap file from my test setup.
I will be using BackTrack5 R1 to capture the .cap file with 4-way handshake and to create the required
.hccap file but will carry out the actual cracking of the .hccap file on a Win7 PC.
This as I am still worried that my knack of fubarring things up could prove life-threatening if I screw up a BTR1 HDD install on my main machine ;) so I'll stick with using a VM image for the time being..
lols..
PREPARATION
===============
First things first, I want to use aircrack to create the .hccap file from a standard .cap file using the new
-J option in aircrack as oclHashcat does not work with the standard .cap files.
The aircrack version included on the stock install of BT5R1 does not yet have this option -J included, so we need to get the latest and greatest from the aircrack site and do the necessary to install.
Grab the latest build of aircrack here (last one in the list at time of writing 06-02-2012 was r2061);
http://nightly.aircrack-ng.org/aircrack-ng/trunk/
extract and cd to directory;
tar -xzf aircrack-ng-trunk-2012-02-05-r2061.tar.gz
cd aircrack-ng-trunk-2012-02-05-r2061
To be able to correctly install the latest aircrack some additional installs required before trying to install aircrack;
(reference; http://hashcat.net/forum/thread-816.html)
apt-get install libssl-dev
(I had previously installed this hence the mention already the newest version)
Then from within the aircrack directory install with ;
make
make install
To update aircrack manually with previously downloaded files, there is a good detailed blogpost
brought to my attention by a reader here http://www.kknd.com.br/security/01/ on how to do that.
Using either of the above methods, you should be ready to rock and roll with the latest aircrack-ng.
Edit 10-02-2012
Backtrack repositories have been updated, the aircrack now included isv1.1 r2076, so;
apt-get update
apt-get upgradewill also get you a current version of aircrack which includes the -J switch.
CAPTURING THE WPA HANDSHAKE
===============
To start the process of capturing the handshake first place the wireless interface in monitor mode using airmon-ng;
airmon-ng
airmon-ng start wlan0
and then fire up airodump with options to focus only on your target AP, in my case ;
airodump-ng mon0 -c 11 -t wpa -d 98:FC:11:8E:0E:9C -w capture
When the handshake is captured, either by patiently waiting for a client to connect, or by forcing a
connected client to disconnect/reconnect with for instance aireplay-ng, this will be noted at the top right hand side of the airodump window.
We can then stop airodump and verify that the handshake is captured with aircrack ;
aircrack-ng capture-01.cap
Now we have our .cap file with 4-way handshake, we need to convert it to .hccap format so that we
can use oclHashcat on it.
To do this we use the -J option in aircrack ;
(again, this option only available in the later aircrack builds, not in the stock install on BT5R1)
aircrack-ng capture-01.cap -J capture
Now we have our .hccap file, I will be switching to my Win7 PC for the actual oclHashcat cracking.
(yeah yeah..I know.. a bit of a fail... ;) )
OCLHASHCAT-PLUS
===============
First of course to download the latest oclHashcat-plus (at time of writing 06-02-2012 v0.07) if you haven't already done so and extract it to where you want, I extracted all files to ;
c:\oclHashcat\
Open up the command prompt ;
Start --> Run --> cmd
And move to the directory where you extracted the oclHashcat files to, in my case ;
cd c:\oclHashcat
I am running a 64bit Windows 7 system with an nVidia card (CUDA) so I need to run the cudaHashcat-plus64.exe file, with --help for further info ;
cudaHashcat-plus64.exe --help
All the info may seem somewhat overwhelming, it certainly did to me, so herewith just a couple of
examples on how it can be used.
I copied the capture.hccap previously created to the oclHashcat directory on the Windows system as
'capture_fubar.hccap'
DICTIONARY ATTACK
===============
I will be using the rockyou dictionary as an example as it is a fairly large one, and copied the rockyou.txt file to the oclHashcat directory for easy access.
To start the crack, we need to specify ;
> The version of oclHashcat we need to use
in my case the 64bit version for cuda enabled cards, for ATI cards, you would use the ocl version.
> -m [hash type #] (see number references for hash types at bottom of help section)
in this case '2500' which is used for WPA/WPA2.
> The path to the hash file / hccap file
in this case 'capture_fubar.hccap' in the same directory.
> The path to the dictionary we are using for the attack
in this case 'rockyou.txt' in the same directory.
cudaHashcat-plus64.exe -m 2500 capture_fubar.hccap rockyou.txt
Press 's' to get an updated status report (I hit enter first to create as space between status reports)
oclHashcat went through over 11,5million passphrases in 2min15sec at around 54k passphrases a second..
Increasing the load on the GPU with the -n option can increase performance and the number of passphrases checked per second ;
cudaHashcat-plus64.exe -m 2500 -n 80 capture_fubar.hccap rockyou.txt
So with the increased load on the GPU it went from around 54k passphrases/sec to around 64k passphrases/sec.
MASK (BRUTEFORCE) ATTACK
===============
From what I read oclHashcat-plus is not yet able to mask bruteforce in increments (so first testing 8 characters then 9, then 10 etc) so you need to test that manually.
However not completely sure on the bruteforce options to be honest as I see in the WIKI there are specific
bruteforce options mentioned, but I can't seem to get that working as of yet.
Reading up ;)
The masked bruteforce attack works by defining character sets to use (if custom character sets are required),
and then uses the masks to define in which position in the passphrase the charsets should be used.
There are various predefined charsets, among which ;
?l -- lower case alpha
?u -- upper case alpha
?d -- numeric values
?s -- special characters including space
To start a mask / bruteforce attack, you need to specify ;
> The version of oclHashcat you need to use
> -m [hash type #] (-m 2500 for WPA/WPA2)
> -a [attack mode #] (-a 3 for bruteforce).
> The custom character sets (if any).
> The path to the hash file / hccap file.
> The mask to use.
The mask used has to match the length of the password, so if testing for a 8 digit password
you have to enter 8 mask entries.
If for instance testing all uppercase values for an 8 character password ;
cudaHashcat-plus64.exe -m 2500 -a 3 capture.hccap ?u?u?u?u?u?u?u?u
If testing for numeric values only for an 8 character password ;
cudaHashcat-plus64.exe -m 2500 -a 3 capture.hccap ?d?d?d?d?d?d?d?d
If we know that for an 8 digit password the 1st 4 digits of the password are numeric values and the last 4 digits are upper case values, then you would specify that as follows ;
cudaHashcat-plus64.exe -m 2500 -a 3 capture.hccap ?d?d?d?d?u?u?u?u
CUSTOM CHARSETS
You can define upto 4 custom charsets to be used, this is done by using the switches ;
-1, -2, -3, -4
So thinking of our above dictionary crack, for the sake of argument, lets say we know the passphrase
used is a 4 digit number only containing the numbers 1 2 3 4 followed by 6 upper case values only containing the letters Y T R E W Q.
We could create a custom charset containing the numbers 1234 and specify these to be used for the
first 4 digits of the passphrase.
and also create a second custom charset containing YTREWQ and specify these to be used for the last 6 digits of the passphrase.
In the mask you would then specify where to use the 1st custom charset and where to use the 2nd custom charset with ?1 for the 1st custom charset and ?2 for the 2nd custom charset as follows ;
Of course this is not a terribly realistic scenario .. but hey, you get the idea..
cudaHashcat-plus64.exe -m 2500 -a 3 -1 1234 -2 YTREWQ capture_fubar.hccap ?1?1?1?1?2?2?2?2?2?2
If you were to actually know that the first 4 digits of the passphrase are '1234' followed by 6 uppercase alpha values then you can define the 1st 4 values of '1234' directly in the mask ;
cudaHashcat-plus64.exe -m 2500 -a 3 -n 80 capture_fubar.hccap 1234?u?u?u?u?u?u
Of course the above examples are for the purpose of explanation only and probably not realistic for real-world scenarios, but I hope it shows at least a small part of how oclHashcat-plus can work.
oclHashcat-plus is truly an awesome bit of kit, the speeds are certainly astonishing to me since I was used
to non-GPU speeds before ;) 30 minutes to get through an 8 digit numeric wordlist ?!! awesome..
And thats just on my nVidia GTX590 which sux big time compared with the benchmarks I see on hashcat's site for the ATI cards..
There are many, many other options I need to get my head around; rules, dictionary mangling, bruteforce, the list goes on and on .. !
A lot more reading and testing required...
A good hint is to to also checkout the GUI for oclHashcat, it gives you a quick visual view of the commands
that you are using so that you can trouble shoot what you are doing wrong when trying just on the command line.
If I messed up anywhere on the above, please comment on it, have just started out trying hashcat so learning as I go !
Linkage/Credits;
http://hashcat.net/oclhashcat-plus/
http://danielweis.wordpress.com/2011/10/13/gpu-password-cracking-of-wpa-using-airodump-oclhachcat-gui-a-basic-how-to/
d3ad0ne's awesomeness ;
http://ob-security.info/?p=31
http://pauldotcom.com/2010/10/your-password-cracking-system.html

No comments:
Post a Comment